The Rat Fan Club
How to Do a Rat Autopsy
by Debbie “The Rat Lady” Ducommun
updated 5/18/11
Warning: This page contains graphic
pictures of rat autopsies.
Note: The word
“autopsy” literally means “self seeing” and technically
is only applied to human bodies. Veterinarians use the term
“necropsy” which means “dead body seeing.” However, personally I prefer to use the
term autopsy as more people are familiar with it, it doesn’t sound as
gross as necropsy, and I like to think that rats are much like little people.
Much
is known about disease in lab rats, but not as much is known about disease in
companion rats. Unfortunately, few
rat owners choose to have autopsies done on their rats. Even when the cause of death seems
obvious, say respiratory disease, the real cause may be different. For example, I’ve found that heart
disease often mimics respiratory disease in rats. I try to do at least a gross autopsy
(which is just looking at the organs and takes only a few minutes) on all rats
that I can. I’d be happy to
do a gross autopsy on your rat if you’d like to send me the remains. I can then bury them here, or return the
body to you.
I
know that some of you don’t like the idea of having an autopsy done on
your rat, but please do consider it.
Once your rat has passed on, the remains are not your rat any longer,
only the vehicle that your rat occupied.
If your rat dies of an unknown cause, I urge you to have an autopsy done
and let me know the results so we can gather more information on disease in
rats. It’s possible that an
autopsy can later help another rat who is having the same symptoms.
Some
vets may be willing to do a gross autopsy for free. However, in some cases to really know
the true cause of death, organ tissue samples must be sent to a pathology lab
which can be fairly expensive. Some
labs offer a special low price for low-income people, so ask your vet about
this possibility. If you plan to
have an autopsy done, and cannot get your rat’s body to the vet right away,
do not put it in the freezer, which will damage the cells. Instead, after sealing it in a zip-lock
bag, place it in the refrigerator.
Then get it to your vet as soon as possible.
Doing
a rat autopsy is very easy. Of
course, I understand that most of you are not going to want to do an autopsy,
especially on your own rat, but I want to make the information available. Perhaps the information will be useful
to your vet, or perhaps you have a friend with a scientific bent who would be
willing to do it for you.
A
gross autopsy consists of examining all the organs to see if their size, color,
shape, and texture is different from normal. In most cases, this will reveal the
major cause of death. In some
cases, tissue pathology will be necessary to identify the major cause of death,
or contributing causes. For this,
small samples of all the organs are needed. It is best if the samples are placed in
a formalin solution (ask your vet), but if necessary they can be placed in
rubbing alcohol. The samples should
be taken gently to avoid damaging them.
Tools
There
are only a few tools you need to do a rat autopsy. You need a pair of sturdy scissors with
a sharp point, a pair of tweezers or forceps, a pair of needle-nose pliers, and
gloves. For measuring, you’ll
need a ruler marked in mm. For
measuring the heart inside the chest, it helps to use a tool called a drafting
divider (see the tool at the bottom in the picture below). You place the two sharp ends of the
divider on either side of the heart and the divider holds that distance so you
can then place the divider on the ruler to measure the distance.

It’s
a good idea to take notes during the autopsy,
otherwise it can be difficult to remember everything. Here are some terms which are useful in
describing an autopsy: lesion—a tissue change; mass—a tumor
textures—brittle,
caseous (cheese-like), firm, friable (easily broken
up), gelatinous, gritty, hard, rubbery, soft, watery
severity—minimal,
mild, moderate, marked.
Starting the Autopsy
First
examine the whole body and feel for abnormal lumps or lesions. Next I recommend checking to see if
there was a pituitary tumor. There may be a tumor present even if it was not
yet causing symptoms.


Step 1 Step
2 Step 3 Step
3
Lay
the remains on the belly. Step 1: With the scissors, cut the skin
on the top of the head from between the eyes to between the ears. Spread the skin apart until you can see
the top of the skull. Step 2: Place the pliers on either side
of the eye sockets and crush the bones between the eyes. Step
3: With the tweezers or forceps, start to remove
the pieces of bone from the eyes to the back of the skull. Gently insert the tool under the bones
to lift and break them up. Step 4: Once you reach the large bones
forming the top of the braincase, work on one side at a time. Apply pressure to get them to separate
in the middle and break on the sides so they lift up like the top of a
cardboard box. This will expose the
brain. Step 5: Gently slide the tweezers or forceps under the front of the
brain, lift it up, and remove it.
It helps if you turn the body on its side to take advantage of
gravity. If a pituitary tumor is
present, it will appear as a dark red blob in the center of the brain
cavity. If there is no tumor, the
bottom of the cavity will feature two ridges. I then replace the brain, fold the bones
back in place, and pull the skin back to cover them.


Step 4 Step
4 Step 5


This picture shows the inside of the skull with the brain
removed. This
photo shows the brain pulled back revealing a very large and
The small pituitary gland can be seen between the 2 ridges. obvious pituitary tumor.
Step 6: Turn
the body over on its back. To open the abdomen, start cutting at the lower portion. You need to cut through both the skin
and muscle. Make the incision as
long as possible.

Step 6
Step 7:
Examine all the organs. To check
the texture of a tissue, cut it open. When you have more experience it will be
easy to see abnormalities in the organs.
Check for tumors and note the location, appearance and size. Fluid in the abdominal cavity is usually
due to cancer or long-standing liver disease.

This picture shows the view when you first open the
abdomen. The large dark red organ at
the top is the liver. Just below it on the right is the stomach, with just the
tip of the dark red spleen visible at the far right, and on the left are the
small intestines. The large greenish structure is the cecum,
part of the large intestines. In rats who
haven’t been eating much, the cecum is usually
abnormally small.

This picture shows most of the deeper abdominal organs after
the intestines have been pulled up out of the way. The other kidney and ovary are on the
other side out of sight. The spleen has been pulled over to the
left of the picture but is usually between the stomach and kidney. The other organs not visible are the bladder
(at the base of the uterus), the pancreas (between the stomach and spleen), and
the cecum (lower right abdomen).

This picture shows a good view of the entire uterus
(which is shaped like a Y) and
ovaries with the other
abdominal organs pulled back out of the way.

This picture, which was taken at an angle, shows the auxillary male reproduction organs.
There are 2 seminal vesicles and one prostate, which is attached to the bladder.
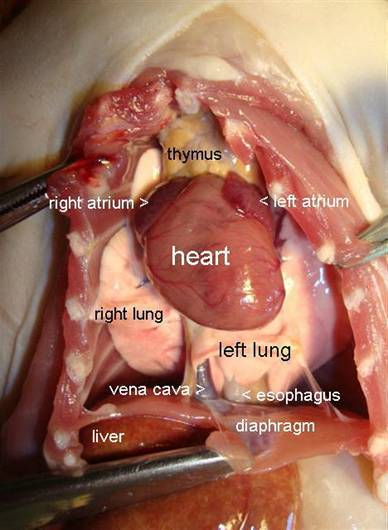
Step 8: To open the chest, continue to cut as
far forward as you can, slightly to the side of center to avoid the
sternum. Cut through the ribs and
spread them open. Observe the lungs. Observe the heart in place, and measure
its length and width. This is
easiest to do with the help of a measuring tool called a drafting divider as it
is hard to get a ruler in the chest (see tools above). You want to measure the heart in place
in the chest because if the heart is abnormally enlarged, it will usually
shrink once it is cut free of the aorta.
In
this picture, the front of the chest with the ribs has been removed for a
better view. This heart is fairly normal looking, although somewhat larger than
normal. The liver does not look
healthy, and was probably the cause of death for this rat. (The purplish area
on the right side of the lung is just a shadow; the picture has been flipped 90
degrees.)


This
heart has an enlarged right ventricle. This
heart has a huge enlarged right atrium
Can
you see how it has ballooned out? It which
is caused by high blood pressure
is so
expanded it extends across the top in
the lungs.
of the
heart.
Step 9: Cut
the heart out of the chest and cut it in half longitudinally to measure the
width of the left ventricle and the thickness of its walls.


This is a normal heart showing the normal size This
heart has a mild case of hypertrophic This
picture shows a heart with a
relationship between the left ventricle and the cardiomyopathy,
where the walls of the left greatly
enlarged right ventricle, which is
thickness of its walls. ventricle
become thickened, narrowing the left caused
by high blood pressure in the
ventricle. This picture also shows the right
ventricle lungs, as well as
some thickening of the
which
pumps blood to the lungs. walls of the left ventricle. (The black stuff
is blood clots.)
Step 10:
Once the heart is removed you can more closely observe the lungs and note any
abnormalities.


This
picture shows lungs with severe This picture shows lungs that are completely
emphysema,
and in front, the typical filled
with small abscesses. This is
common
“cobblestoning” caused by mycoplasma. in rats with untreated respiratory disease.
Can
you believe this rat lived up until now?
For
more autopsy pictures of lungs, click here.
When
the autopsy is finished, the incisions can be sutured closed if desired.
Here
is a chart detailing the most common abnormalities seen:
Organ Usual
Abnormalities Possible
Disease
Large intestines
redness
inflammation.
(Depending
on length of time since death, may be bloated due to decomposition.)
Small
intestines redness
inflammation
Uterus
(unspayed female) redness,
swelling, pus infection,
typically mycoplasma
Seminal
vesicles yellow
rubbery matter prostate
disease?
(unneutered male-neutering causes them to shrink to 1/3)
Prostate
(male)
enlarged prostate
disease
Bladder overly
full urinary
blockage
Kidneys speckled,
grayish pink, rough degeneration
Spleen
enlarged non-specific
sign
Liver enlarged,
spots, swollen infection,
degeneration
(Speckling
may occur due to decomposition)
Stomach empty poor
appetite
bloated with air respiratory
distress
Heart,
exterior enlarged dilated
cardiomyopathy
Heart,
interior thick
walls hypertrophic cardiomyopathy
Lungs expanded
and enlarged emphysema
“raspberry” texture mycoplasma
large abscesses mycoplasma
spots of pus, mottling pneumonia
dark red pneumonia, shock

News | Rat Info | Adopt a Rat | Rat Books
Reviews | Merchandise | Special Events
Meet the Ratlady
| Links | Home
Rat Fan Club
Copyright 1999-2014